This guide is for everyday use of your AXEN R290 heat pump's wired controller. You'll find clear, step-by-step instructions for the things you'll actually do — turning the system on and off, adjusting temperatures, switching modes, and using smart features like Quiet Mode, Absence Mode, and weekly schedules. You don't need to read this front to back. Use the table of contents below to jump to whatever you need. Each section is self-contained.
01Safety first
A few important things to know before you start using your heat pump.
If you're not sure how to operate the unit, contact your installer. Anything beyond what's in this guide — particularly anything involving the refrigerant, electrical wiring, or internal components — must be handled by an authorised technician.
Don't rinse the unit. Water can cause electric shock or damage.
Children should not play with the unit. The appliance isn't intended for use by people with reduced physical, sensory, or mental capabilities, or lack of experience, unless supervised.
Don't dismantle the unit yourself. Refrigerant handling, oil disposal, and parts treatment must be done by an authorised installer in line with applicable regulations.
End-of-life disposal: the unit must be taken to a specialised treatment facility for recycling — not put in household waste.
02Meet your controller
Your wired controller has a display and six buttons. Here's what each one does.
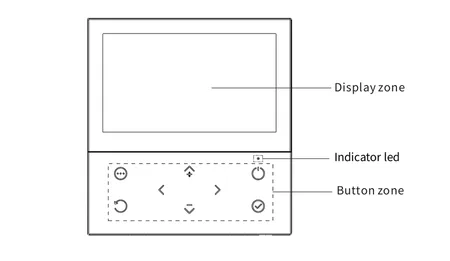
| Button | What it does |
|---|---|
⋯ MENU | Opens the main menu from the home page. |
⏻ ON / OFF | Turns space heating, cooling, or DHW on or off — depending on what's selected on screen. |
‹ › ▲ ▼ | Arrows — move the cursor on screen, navigate menus, adjust settings, flip pages. |
↶ BACK | Goes back to the previous level. |
✓ ENTER | Confirms a selection or enters a submenu. |
The indicator LED tells you the unit's state: always on when the unit is off, flashing once every two seconds when the unit is running, and flashing fast when software is being updated.
03Reading the screen
The home page shows everything you need at a glance — current temperatures, the operating mode, and any active features. Here's what each part means.
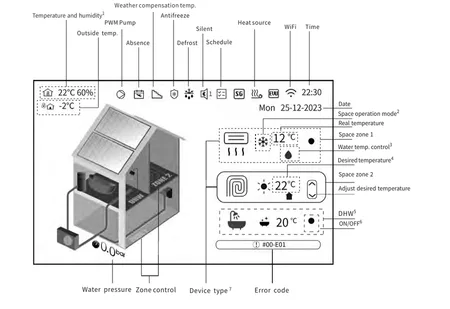
Operation mode icons
The mode icon appears in the heating/cooling area on the home page:
| Mode | Meaning |
|---|---|
| Sun ☀ | Heating — the unit is warming your home. |
| Snowflake ❄ | Cooling — the unit is cooling your home. |
| A in circle | Auto — the unit picks heating or cooling automatically based on conditions. |
What temperature you're seeing
A water-drop icon next to a temperature means it's the leaving water temperature (the water sent to your radiators or floor loops).
A house icon next to a temperature means it's the room temperature where your wired controller is mounted.
If a small circular icon is shown beside the temperature, you're looking at the desired temperature. Otherwise, you're seeing the actual current temperature.
Status indicators along the top
| Icon | What it means |
|---|---|
⌂ 22°C 60% | Real room temperature and humidity (where the controller is mounted) |
⌂ −2°C | Outside temperature |
 | PWM pump active |
 | Absence Mode is on |
 | Weather Compensation is active |
 | Antifreeze protection running |
 | Defrost cycle in progress |
 | Quiet (silent) mode active — the number indicates the level |
 | A weekly schedule is running |
 | Heat source / backup heater active |
 | WiFi connected (flashing = pairing) |
22:30 | Current time |
An icon only appears when the relevant function is active. If you don't see a specific icon, that function isn't running right now.
04Daily operations
The things you'll do most often. Tap any card to expand it.
Turn the system on or off
You can turn space heating/cooling and hot water (DHW) on or off independently from the home page.
- On the home page, use the
▲or▼buttons to move the cursor (a blue rectangle) onto the part you want to control — the heating/cooling area or the DHW (bath) area. - Press the
⏻ ON/OFFbutton. A small dot appears next to the area to confirm it's on; the dot disappears when it's off.
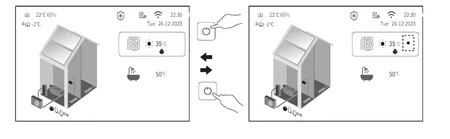
To turn both on at once: first turn on space heating/cooling as above, then move the cursor to the DHW area and press ⏻ again.
If a room thermostat is installed and active, the controller may show: "Please turn on or off HEATING or COOLING mode by the room thermostat." In that case, use the wall thermostat instead — not the controller.
Adjust the heating or cooling temperature
How you change the temperature depends on whether weather compensation is switched on:
A · Weather compensation OFF (default) — set the temperature directly from the home page:
- On the home page, use
▲/▼to highlight the heating/cooling area. - Press
✓ ENTER. Up/down arrows appear next to the temperature. - Use
▲to raise and▼to lower the temperature. - Press
✓ ENTERagain to confirm, or wait a few seconds — the new temperature is saved automatically.
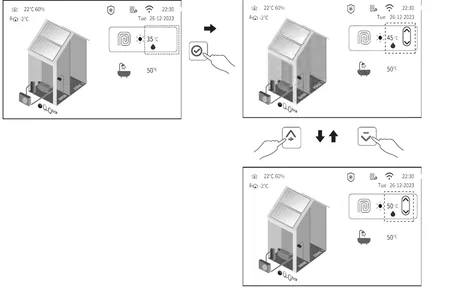
B · Weather compensation ON — the home-page arrows no longer set a fixed temperature. The supply water temperature follows the selected heating curve, so you change it from the curve menu instead:
⋯ MENU› User Control › Weather Compensation
- Choose the zone and mode the curve applies to: Zone 1-H (zone 1 heating), Zone 1-C (cooling), Zone 2-H, or Zone 2-C. Press
✓ ENTER. - Pick a preset curve. There are 8 presets — a lower number gives lower water temperatures (more economical, gentler heat), a higher number gives higher water temperatures (faster warm-up, less efficient).
- Confirm. The curve becomes active and the ↘ icon appears on the home page.
None of the presets fit? Choose curve 9 — “Custom curve” to define your own outside-temperature → water-temperature points for that zone and mode, on the same User Control › Weather Compensation page.
In short: weather compensation off → set the temperature here on the home page (section A); weather compensation on → change it from User Control › Weather Compensation (section B). While a curve is active, the desired temperature can’t be set directly on the home page — it follows the curve.
Adjust the hot water (DHW) temperature
Same idea as above, but on the DHW area of the home page:
- Use
▲/▼to move the cursor to the DHW (bath icon) area. - Press
✓ ENTER— adjustment arrows appear. - Use
▲/▼to set the temperature you want, then press✓ ENTERto confirm.
Reasonable DHW temperatures are typically 45–55 °C for daily use. Higher than 60 °C wastes energy and increases the risk of scalding. The system also runs a periodic anti-legionella cycle (see Smart Features) — you don't need to set high temperatures manually for hygiene.
Switch between heating, cooling, and auto
To change the operating mode for space heating/cooling:
- On the home page, press and hold the
⋯ MENUbutton. - Don't release until you see the mode icon change. The mode cycles through: Heating (sun) → Cooling (snowflake) → Auto (A).
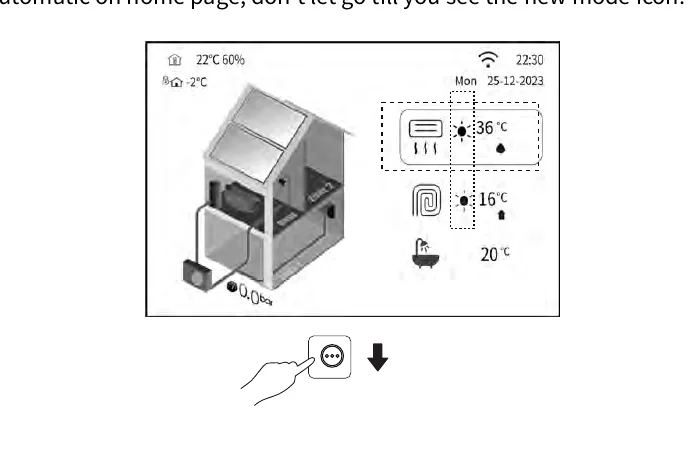
Auto mode lets the system decide whether to heat or cool based on outside temperature. It's a "set and forget" option for shoulder seasons.
If you have multiple zones
Some systems are set up with two heating zones — for example, underfloor heating downstairs and radiators upstairs. If yours is, you can adjust each zone separately through a dedicated menu.
To open the zone menu:
⋯ MENU› User Control › Zone1.Zone2.DHW
Inside, you can:
Turn each zone on or off
Set the operation mode (Auto / Heating / Cooling / DHW) per zone
Set the desired temperature per zone
Configure a weekly schedule per zone
Use ‹ / › to switch between Zone 1, Zone 2, and DHW. The current zone is shown at the top of the screen.
05Smart features
These are the features that make your heat pump comfortable and efficient. Most of them you set once and forget.
Weather Compensation — let the heat pump self-adjust
Weather compensation automatically lowers the water temperature when it's mild outside and raises it when it's cold. This saves energy and keeps the home comfortable without you having to fiddle with the thermostat.
To enable it:
⋯ MENU› User Control › Weather Compensation
- Choose which zone and mode the curve applies to: Zone 1-C (cooling), Zone 1-H (heating), Zone 2-C, or Zone 2-H. Press
✓ ENTER. - Pick a curve. The system shows several preset curves (Curve 3, 4, 5…) — each defines how the supply water temperature changes with outside temperature.
- Confirm. The curve becomes active and the icon ↘ appears on the home page.
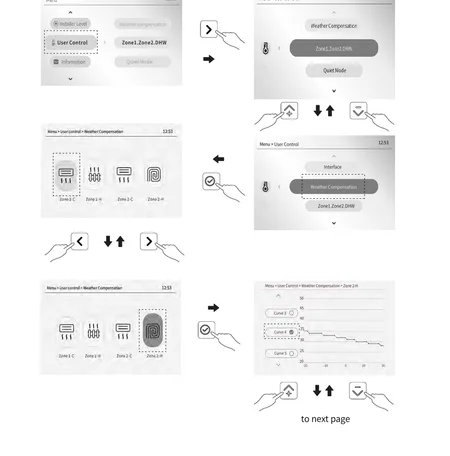
Which curve should you pick? A lower-numbered curve gives lower water temperatures (more economical, slower response). A higher-numbered curve gives higher water temperatures (faster warm-up, less efficient). Your installer will normally pick a sensible default — change it only if you're consistently too warm or too cold.
Quiet Mode — quieter operation at night
Quiet Mode reduces fan and compressor noise. Heating or cooling capacity drops slightly as a trade-off, so it's mainly for night-time use.
To enable Quiet Mode:
⋯ MENU› User Control › Quiet Mode
- Press
‹/›to choose a quiet level: Level 1 (slight reduction) or Level 2 (more reduction, quieter). - Press
✓ ENTERto enable. The unit will run at that level until you turn it off.
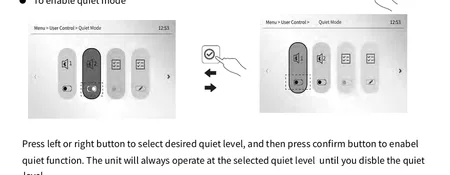
You can also set Quiet Mode to come on automatically using a weekly schedule. Select the schedule icon (📋) instead of a level — see the Weekly Schedule card below.
Absence Mode — when you're away from home
When you're on holiday in winter, Absence Mode keeps the system from freezing while saving energy. The unit stays "off" most of the time, but if water temperature drops too low it kicks in automatically to prevent freezing damage.
To enable Absence Mode:
⋯ MENU› User Control › Absence Mode
- Highlight Absence Mode in the menu and press
✓ ENTER. - A confirmation appears: "Enable Absence mode?" Press
✓ ENTERto confirm or↶ BACKto cancel.
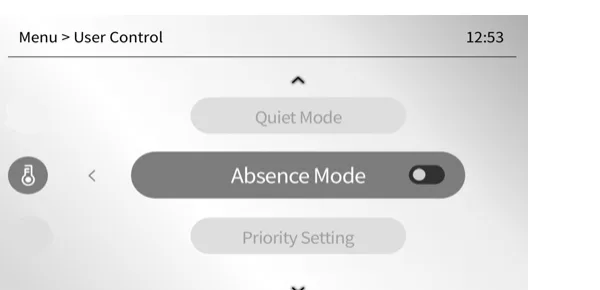
When you come home, repeat the same steps to disable it.
Important: leave the unit's power supply on while you're away. Absence Mode only works when the unit has power — if you cut power, the antifreeze protection won't run.
Hot Water Boost — extra hot water now
Need a tank full of hot water in a hurry? Hot Water Boost runs the heat pump and any electric backup heater together to heat the DHW tank as fast as possible. It's a one-time function — it switches off automatically once the target temperature is reached.
To activate it:
⋯ MENU› User Control › Hot Water Boost
- Highlight Hot Water Boost and press
✓ ENTER. - Confirm "Start Hot Water Boost?" with
✓ ENTER.
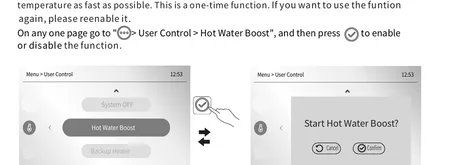
Once the boost finishes, the function turns itself off. If you want to use it again later, you need to re-enable it.
Backup Heater — force the electric backup on
If your system has an internal pipe backup heater (IPH), an additional heating source (AHS), or a water-tank heater (WTH), this function forces it on. Like Hot Water Boost, it's a one-time effective function.
To activate it:
⋯ MENU› User Control › Backup Heater
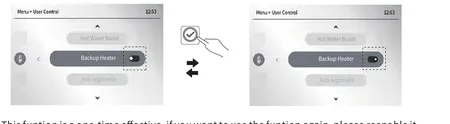
If your unit doesn't include any backup heater, this function does nothing — you can safely ignore it.
Anti-legionella — automatic hot water hygiene
Anti-legionella heats the DHW tank to 55–75 °C to kill any bacteria. It's good practice to run this periodically — once a week is standard. The system can do it on a schedule, or you can run it manually.
To configure or run it:
⋯ MENU› User Control › Anti-legionella
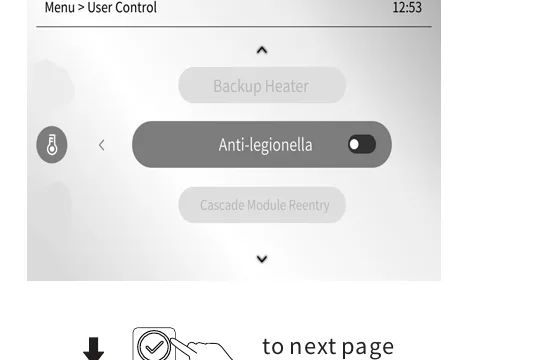
You can either:
Run it manually — one-time effective. To run again, you must re-enable.
Schedule it — set a recurring weekly run.
Heads up — hot water! While anti-legionella is running, tap water temperatures will be very hot (up to 75 °C). The disinfection icon (a bath with a small heat symbol) will appear on the home page during the cycle.
Weekly schedules
You can program a weekly schedule for almost everything: space heating/cooling, DHW, Quiet Mode, and Anti-legionella. Each schedule has up to 6 timers per day, each with a start/end time, mode, and target temperature.
To make a schedule for Zone 1, Zone 2, or DHW:
⋯ MENU› User Control › Zone1.Zone2.DHW
- Select the zone (Zone 1 / Zone 2 / DHW) using
‹/›. - Highlight Wk. Sch. at the bottom and press
✓ ENTER. - Set the timers for each day: start time, end time, mode (Heating/Cooling/Auto/DHW), and temperature.
- Enable the schedule with the on/off toggle.
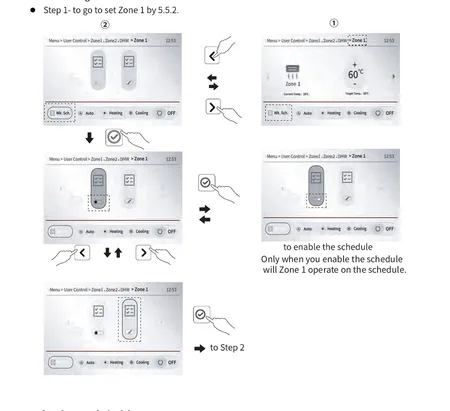
Example schedule
Imagine you want hot water early in the morning and again in the evening, heating during the day, and cooling for a few midday hours when it's hot:
| Timer | Start | End | Mode | Temp |
|---|---|---|---|---|
| T1 | 1:00 | 3:00 | DHW | 50 °C |
| T2 | 7:00 | 9:00 | Heat | 28 °C |
| T3 | 11:30 | 13:00 | Cool | 20 °C |
| T4 | 14:00 | 16:00 | Heat | 28 °C |
| T5 | 15:00 | 19:00 | Cool | 20 °C |
| T6 | 18:00 | 23:30 | DHW | 50 °C |
Schedules per zone are independent. A schedule made on Zone 1 only applies to Zone 1, not to Zone 2 or DHW. Set each one separately.
If you're using the mobile app and you set a schedule there, it overrides the controller's schedule.
06Display & preferences
Adjust the controller itself — brightness, language, sound, child lock, and so on.
All these are under: ⋯ MENU› User Control › Interface
Backlight brightness
Open Interface › Backlight. A brightness bar appears — use ‹ / › to slide it darker or brighter, then ✓ ENTER to confirm.
Date and Time
Open Interface › Date Time. Use the arrow keys to step through year, month, day, hour, and minute, adjusting each one with ▲ / ▼. Confirm with ✓ ENTER.
Buzzer (button beep)
Open Interface › Buzzer and toggle on/off. When on, the controller beeps each time you press a button.
Child Lock
Open Interface › Child Lock and toggle on. Once locked, button presses are ignored — useful if you don't want kids changing settings. To unlock, press and hold ↶ BACK for 5 seconds.
Screen Black Time (auto-dim)
Open Interface › Screen Black Time. Set how long the screen stays lit before turning off automatically. Pressing any button wakes it up again.
Language
Open Interface › Language. The default is English. Use ▲ / ▼ to scroll through the list (English, Español, Português, Deutsch, and others), then ✓ ENTER to confirm.
07WiFi & mobile app
Control your heat pump from your phone. Setup takes a couple of minutes.
Step 1 — Set up your phone
- Install the Thermomax app — search for it in the App Store (iOS) or Google Play (Android).
- Open the app, create or sign in to your account.
- Make sure your phone is on the same WiFi network as the heat pump will connect to. The router should be on and broadcasting.
Step 2 — Put the controller into pairing mode
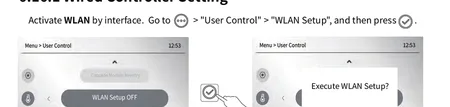
⋯ MENU› User Control › WLAN Setup
- Highlight WLAN Setup and press
✓ ENTER. - Confirm "Execute WLAN Setup?" with
✓ ENTER— to cancel, press↶ BACK. - The WiFi icon (📶) on the screen starts flashing — the controller is now waiting to be paired.
Step 3 — Add the device in the app
In the Thermomax app, choose Add Device and follow the prompts. The app will discover the heat pump and ask you for your home WiFi password.
Once paired, the WiFi icon stops flashing and stays solid. From that point on, you can adjust temperatures, modes, and schedules from your phone — even when you're away from home.
08Information you can check
The Information menu gives you a read-only view of how your system is doing.
Get to it with: ⋯ MENU› Information
| Item | What it shows |
|---|---|
| Software Version | The firmware version of the main PCB and the wired controller. Useful when calling support. |
| Energy Information | Energy used and produced by the unit. (Optional — only available on some configurations.) |
| Parameter View | Live values from the unit's sensors — temperatures, pressures, fan speed, etc. Mostly useful for an installer or technician. |
| Weekly Schedule View | A read-only overview of the schedules currently configured. |
09When something seems off
A few quick checks before reaching for the phone.
The screen is blank
Press any button — the screen may have gone to sleep automatically. If it stays blank, check that the unit has power. If still nothing, contact your installer.
The home page shows an error code (e.g. #00-E01)
Note down the exact code (it'll look something like #00-E01 or similar) and contact your installer. Don't try to ignore it by power-cycling — the cause needs to be diagnosed.
The unit isn't heating, even though it's set to Heating
A few things to check:
Is space heating turned on? Look for a small dot next to the heating area on the home page.
Is the desired temperature higher than the actual temperature? If they're already equal, the unit is doing its job.
Is Absence Mode active? You'll see a tent-like icon (⛺) at the top of the screen — disable it from the User Control menu.
Is a weekly schedule overriding things? Check the schedule (📋) icon. Disable the schedule if you want manual control.
Is a room thermostat installed? If so, the controller can't override it — adjust the thermostat instead.
The unit is louder than expected
This is usually normal — the heat pump is working harder. But if it's bothersome, you can enable Quiet Mode (see Smart Features). For night-time, set up a schedule that runs Quiet Mode in the evening hours.
If the noise sounds unusual (rattling, knocking, screeching), turn the unit off and contact your installer.
I've forgotten how to do something
Press ↶ BACK repeatedly to get back to the home page — you can't break anything from the menus. From there, use this guide to find what you need.
Need a technician? Contact AIT-Nord OÜ. Have your unit's serial number ready — it's on the rating plate on the heat pump itself, and it's also in Information › Software Version.